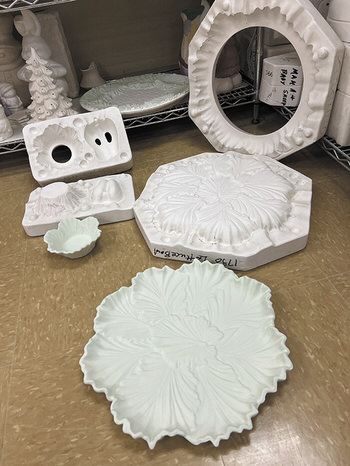
Lettuce bowl molds (large and small) and the bisque versions painted with one layer of glaze
Lorraine Wilson
What? Mold in the Ceramics Room? No, not the nasty kind of mold, folks. We are talking ceramic molds, and the Kiln Krafters collection is growing. After a recent find at an estate sale and a little negotiation, over 100 new molds were added to the collection.
And just what are all these molds used for? For Kiln Krafters members, the molds are creative outlets for their imagination, with over 400 different molds in categories such as animals, baskets, holiday, garden, home décor, kitchen, vases, pots, and planters, to name just a few. Within the animal category are molds of dogs, cats, elephants, sheep, and rabbits, to name just a few. Holiday molds include designs for Valentine’s Day, St Patrick’s Day, Easter, Fourth of July, Halloween, Thanksgiving, Christmas, and Hanukkah.
The garden mold collection includes several beautiful designs for stepping stones, planting pots, and decorative statues to put in your yard. There is a wide variety of molds available in the kitchen collection, including items such as cups, spoon rests, plates, dishes, creamers, jars, bowls, decorative platters, napkin holders, pie plates, pitchers, sugar bowls, teapots, trivets, and tureens, all in a variety of designs.
The home décor mold collection contains everything from angel plaques, a variety of decorative boxes, butterflies, candle holders, chess set, cowboy boot, various leaf and grape bowls, toothpick holders, and Texas plaques, to name just a few!
And how exactly are molds used to create ceramic pieces? The first step in creating a ceramic masterpiece is selecting the mold. Step two consists of lining up the pieces of the mold and securing it tightly with straps. Next, slip is slowly poured into the mold until it reaches the top. Then wait 15 to 25 minutes to let the slip thicken, then turn the mold over onto a rack and pour out the excess slip. Let the mold rest on the rack for another 20 to 40 minutes until the casting begins to pull away from the wall of the mold.
Once the casting is dry, remove the straps from around the mold and turn the mold on its side, then gently lift the top half of your mold off the casting, then remove vesting from the mold. Once the greenware has dried for a few days, clean the piece by smoothing out the seams, rough edges, and any creases or imperfections from the mold using a damp sponge or wooden tools. Let the piece continue to harden until it is bone dry. Then the piece goes into the kiln to be fired! Once finished in the kiln, your masterpiece is ready to paint. If using glazes, the piece will need to be fired a second time. If painting with acrylics, no further firing is needed.
For those members who are unable to pour for themselves, there are a number of people who are always willing to help. For a nominal fee, a thoroughly trained member will pour the piece you want to work on.
Interested in joining Kiln Krafters? New member orientation to Kiln Krafters is $45, which includes slip, tools, pour, and kiln firing fee for your first project. If you have questions or need more information, you can reach out to Kiln Krafters via email at rrtxkilnkrafters@gmail.com.
